You are here
Flying the FE.2b
“The Fe2b began its production life near the end of 1915 arriving on the Western Front in January 1916 as a front line fighter.”

At this point in the war Aircraft were being designed as fighters from their inception rather than fitting an existing design with guns.FE stands for “Farman Experimental”, the RAF’s designation for Pusher configurations at the time. For a short period, it was an effective fighter, for this was the age of the pusher. Prior to the advent of the interrupter gear allied Pusher types ruled the sky; types like the FE2b, DH2 and the Vickers Gun Bus. Deadly formations of Fee’s could wreak havoc on enemy aircraft, heavily armed and armored, they were dangerous from nearly every angle.
German ace Max Immelmann was killed during a fight with an FE2b on June 18th 1916. Although Manfred von Richthofen’s first victory was an Fe2b, he was later shot down suffering a severe head injury during an attack on a formation of Fe2d’s July 6, 1917. The Fee quickly became obsolete to more maneuverable faster aircraft. It was withdrawn from frontline daylight duties in early 1917, however its stable design and large payload made it perfect for bombing missions and Fe2’s carried out the night bombing role until the end of the war as well as Home Defense and anti Zeppelin patrol. I would imagine by the end of the war a zeppelin was the only craft an FE2b could overtake! Other roles the Fee was well suited for were Photography missions, night search duties and night bombing missions. Photographing enemy trenches and gun emplacements may have been the reason for the Fee’s heavy steel armor plating mounted beneath the cockpits on the bottom of the nacelle, after all, flying 200 feet above the enemy at 70 MPH would leave the pilot and observer open to all sorts of enemy gun fire from below. A fixed camera was mounted to the side of the aircraft for these missions. Night operations in general are often forgotten as were the Zeppelin attacks on London. The Fee’s sturdy undercarriage was well suited to harsh night landings, the slow speed and good forward visibility were also in its favor and its slow speed didn’t matter much under cover of darkness.
The first production aircraft were fitted with 120 Hp Beardmore engines, later versions were fitted with 160 Beardmore engines as well as 12 cylinder air cooled RAF5a engines similar to those found in RE8’s. The most powerful version was the Rolls Royce Eagle powered Fe2d of 250 HP, many of these later aircraft did away with the complicated Oleo type landing gear in favor of the simpler lighter “Vee” type landing gear which allowed a single 230 lb bomb to be carried beneath the nacelle. The maximum bomb load for the Fe2b was 350lbs. Fully loaded with bombs the Fee’s speed was between 60 and 70 MPH - it would take ten minutes to reach 3,000 feet. 
With a span of nearly 50 feet (47 feet, nine inches) and an all up maximum weight of 3,307 lbs, this is a very big fighter. The upper centre section alone is nearly sixteen feet wide. The horizontal stabilizer is the size of a wing itself. All this size comes with a price, the drag it creates only allows the Fee a normal cruise speed of 70-75 MPH.
“As you approach this aircraft you become aware of its size and presence, it is like no other first World War aircraft I have been close to.”

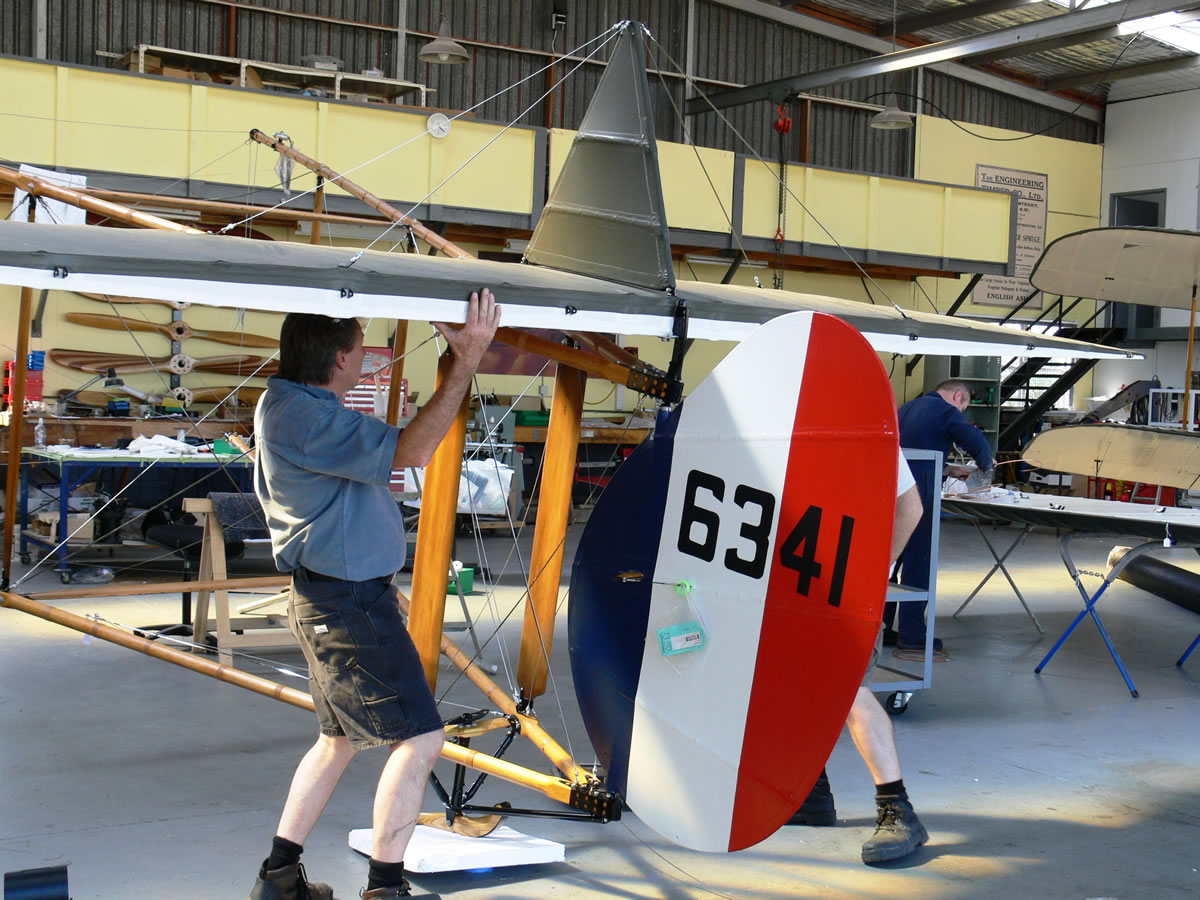
It’s unique, and its departure from conventional designs are so overwhelming, it almost looks comical. The Vintage Aviator Ltd., FE2b is finished in the colors of an early production aircraft bearing the serial 6341 of No. 25 Squadron RFC, flown by Capt. Douglas Grinnell- Milne and observer Corporal D MacMaster. This aircraft was one of four presentation machines gifted to No. 25 Squadron marked with its benefactor, The Government of Zanzibar on the port side “Zanzibar No. 1”. Number 2 Squadron was formed at Montrose Scotland and this was reflected in the name “ The Scotch Express” on the starboard side. On may 16, 1916 this aircraft was forced down by Ltn. Gontermann of Jasta 5 and extensively photographed in German hands.

“As a pilot, watching an aircraft like this grow from the single first part to an amazing work of art, it becomes part of you. You remember each stage of construction, each problem, every area to be concerned with and most of all an understanding of this particular machine.”
I can recall reading a report from the RAF titled “The essential Characteristics of successful and unsuccessful Aviators” which states that a pilot should NOT have mechanical knowledge of his machine! The feeling was that “from the very nature of his work, he must be prepared to throw the machine about, and at times subject it to strains that did he realise how near he was to the breaking point his nerve would go very quickly”. In the case of the Fee, I’m glad I had the chance to watch this aircrafts construction - maybe I know too much but at the very least I have an understanding and know what to expect. I have an understanding of the machine and its limitations, as well as the experience of other aircraft with which to compare it to.
PREFLIGHT
Prior to taking any “Crate” into the air it is wise to perform a proper preflight inspection, this is no easy task with the F.E.2b. You can almost walk under the lower wings which makes looking at the aileron cables and landing gear an easy task, but forget about looking at any pullies or hinges on the top wing or centre section without a ladder. The RAF oleo landing gear is a web of tubes, joints , universal ends and bracing wires that mount a pair of 750mm diameter main wheels and a tiny nose wheel to prevent “nose overs”.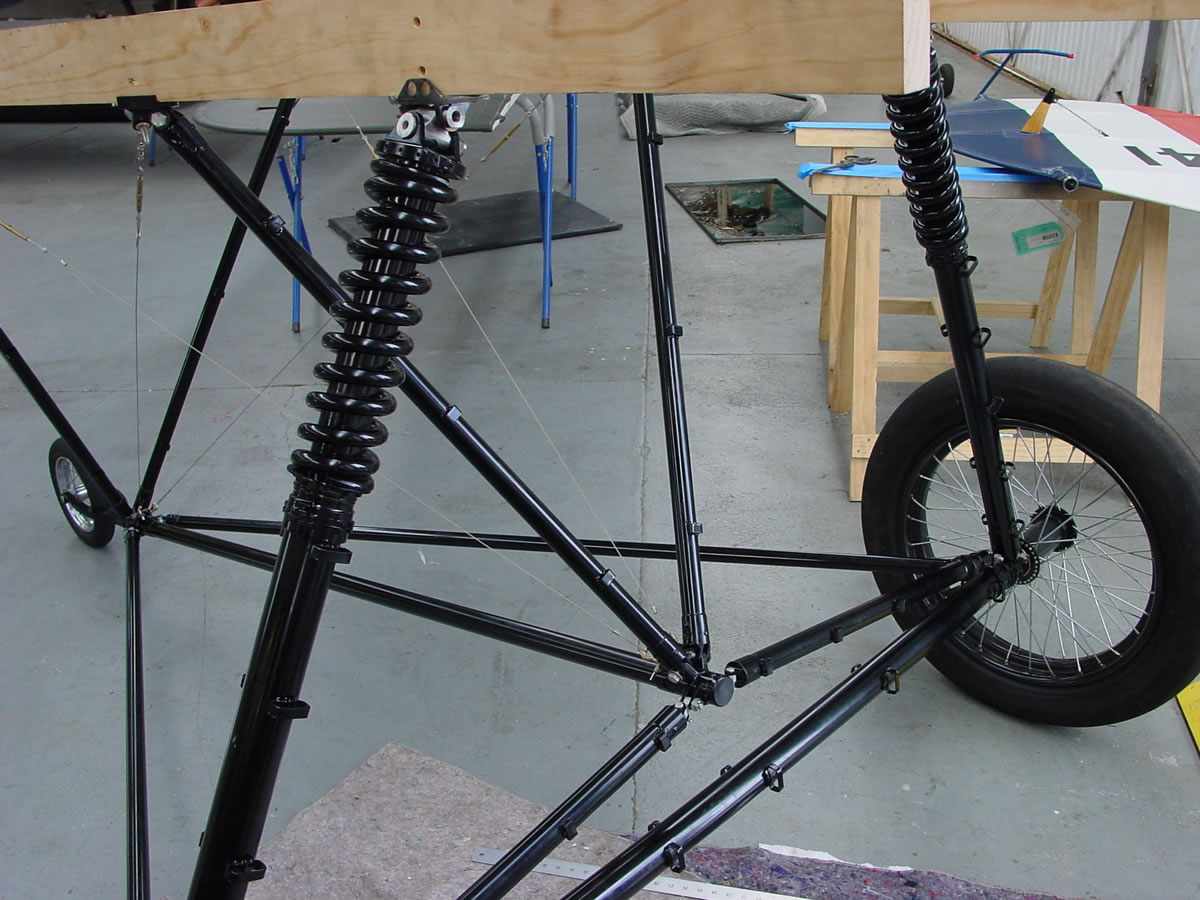
This type of undercarriage is not often seen on first World War fighters and is difficult to construct due entirely to the large number of machined steel parts and close tolerances required to make it work properly. The high undercarriage was an asset for the Fee when operated at night since a forced landing almost always meant a crash. Many a crewmember was thrown clear of the wreckage unless the Fee hit a building or tree and in this case injuries were more likely fatal as the heavy engine crushed the occupants. Simply check for fluid leaks on the oleo gear, make sure the complex fairings are attached and intact, and then make sure the wind driven air pump under the nacelle is serviced with a few squirts of fresh oil. This tiny air pump is what pressurizes the main fuel tank forcing fuel uphill to the engine.
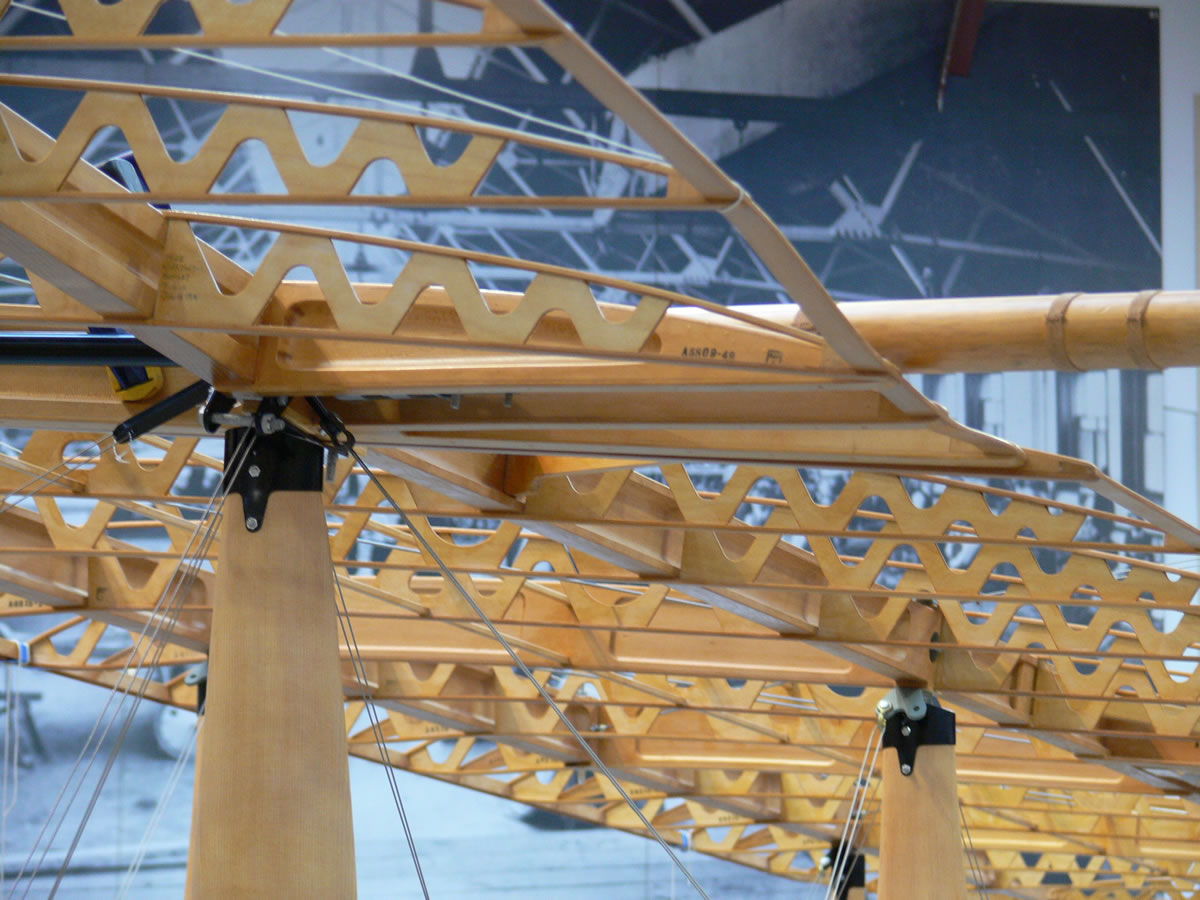
The next areas to check are the fragile outriggers or tailbooms. These four main structural members support the massive horizontal stabilizer and rudder and the tiniest of vertical stabilizers. The outriggers are intricate routed hollow pieces of spruce, laminated together, wrapped with linen cord at regular intervals and joined to the wing centre sections with metal fittings. These fragile timber members are easily damaged by enemy fire or even by debris thrown about by the propeller - still a hazard today. Never ever lift the tail by the outriggers unless your hands are next to one of the many vertical struts. These four outriggers support a large effective rudder that pivots on its forward spar. At the aft end of the aircraft almost all of the critical components are easily accessible and exposed for inspection. The tailskid bungees are out in the open and so are all of the attach fittings, and bolts.
In fact most of this airplane is exposed in some way, even the engine hangs half out of the airframe. Once we are certain the airframe is safe for another flight we must carry out some routine servicing of the engine. Top up the radiator with “Rain water” as the Beardmore manual recommends, screw in each brass “greaser” at least one turn to force lubricant to critical moving parts like the valve rockers, magneto drive and water pump. Almost all of the other exposed moving engine parts are lubricated with a squirt from an oil can prior to each flight. This airplane creates a full time job for someone to grease, oil, fill, clean, tighten and wipe! While we are looking the engine over and wiping the used oil from the crankcase, it is a good idea to have a close look at the two ash engine mounts. These two wooden rails are what the massive 600 lb engine sits on and also support the 90 lb radiator.
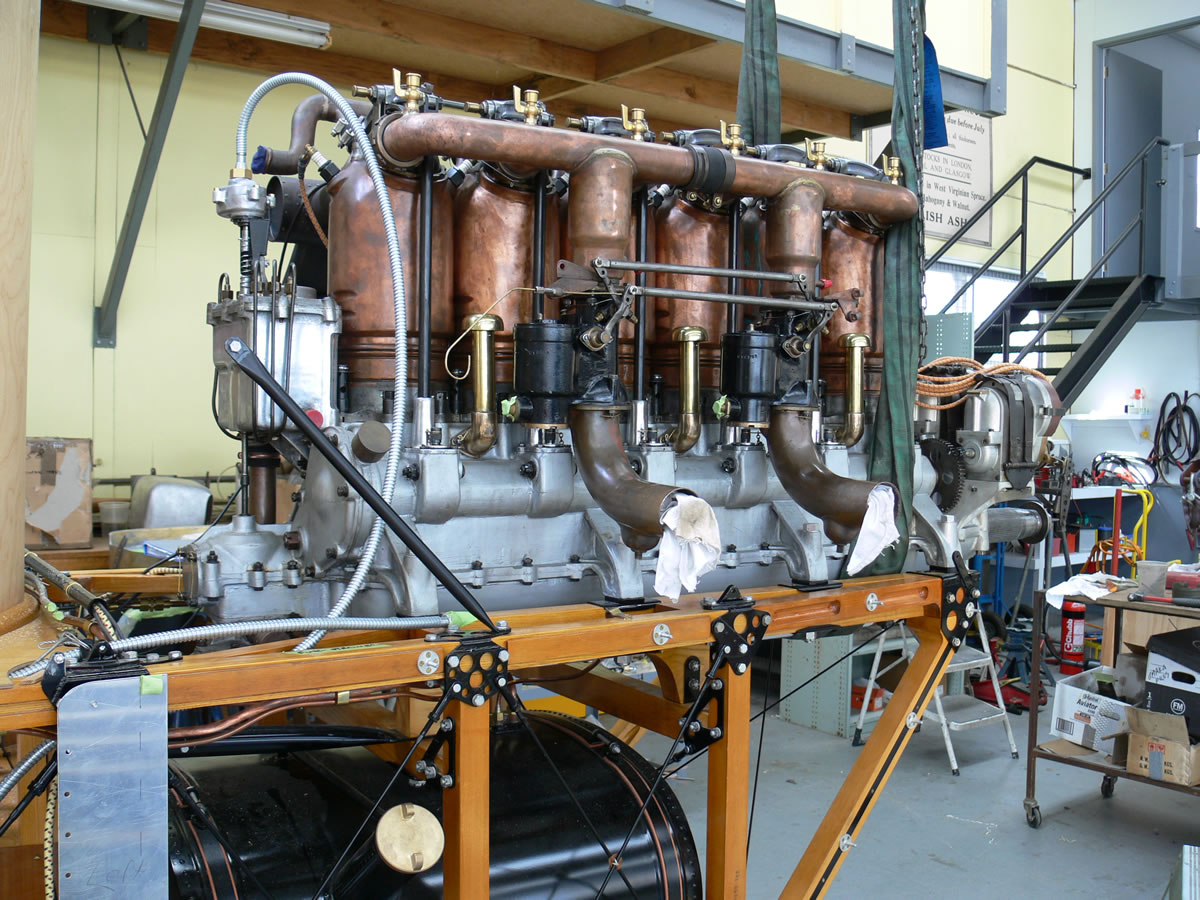
“The engine is a work of art in itself, a sturdy cast aluminum crankcase sprouting six very large copper jacketed cylinders.”
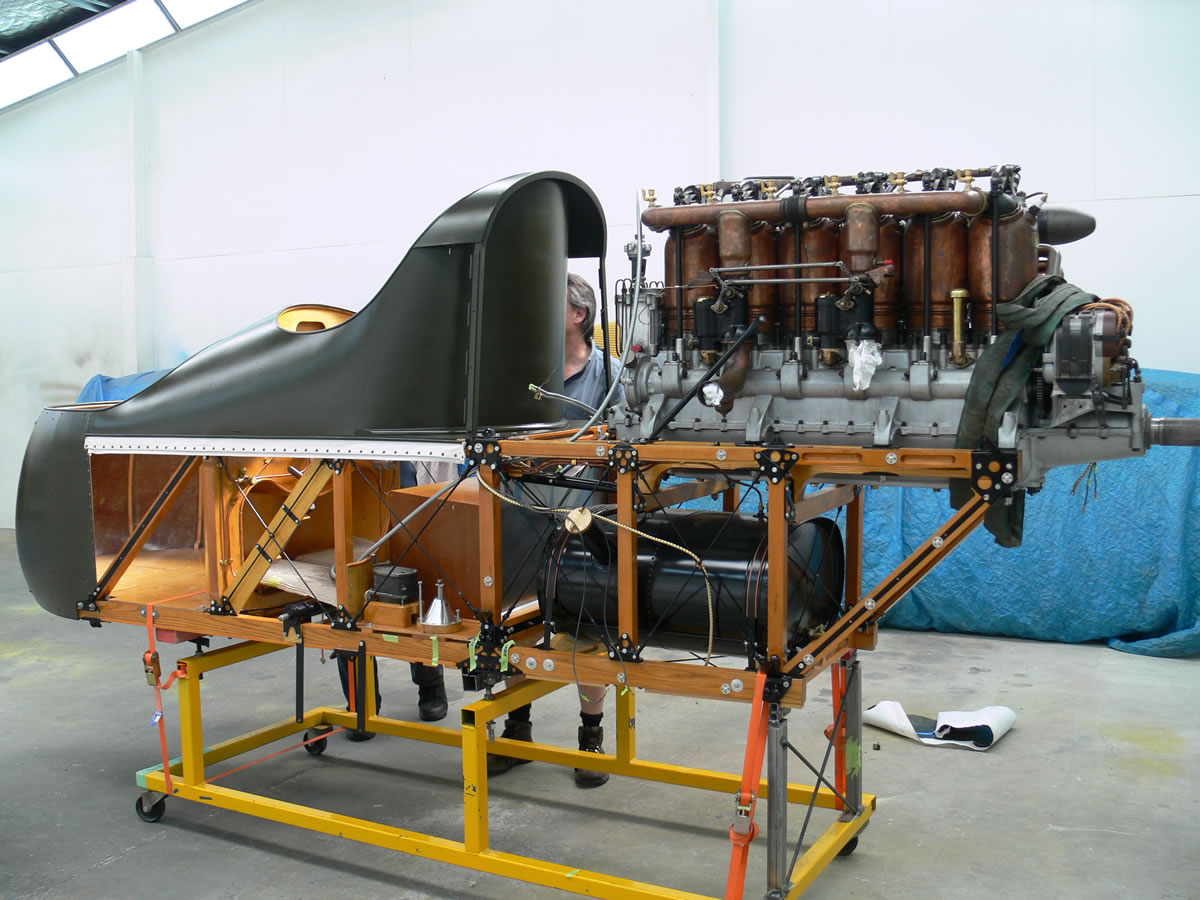
Over 1000 cubic inches in size, consuming fuel at a rate of 13 imperial gallons per hour at full throttle, 1300 RPM. Normal cruise is a mere 1250 Rpm. Recommended time between overhauls is 300 Hrs and the factory recommends sending it back to them! An external “Lubricator” (which has a capacity internally to supply the engine for 30 Minutes) and a reserve oil tank is fitted, filled with “Vacuum BB “ or Castor oil. The engine has that distinct castor oil smell when running. The oil sump is made up of six compartments each allowing an individual connecting rod to “scoop” up a bit of oil on each revolution. These sumps have a combined capacity of 5 pints. Because of this system, the Beardmore manual warns the pilot not to exceed 14 degrees of pitch for extended periods (we wouldn’t want all of our oil to slosh to the back of the engine leaving the front conrods high and dry). The lubricator provides pressure oil to the engines main crankshaft bearings and to the cylinder walls via external lines.Built by the Beardmore Aero Engine Co. in Glasgow Scotland, the engine is essentially an upgraded copy of an Austro Daimler engine. Its design has another unusual feature, Desaxe cylinders. This means that the cylinders themselves are offset from center line of crankshaft. (A Desaxe engine means one in which each cylinder is not positioned with its exact center (the bore axis), directly above the centerline of the crankshaft. Instead, the cylinder is offset slightly. If the offset is in the direction of rotation, it has the effect of increasing the leverage applied to the crankshaft during the "power" stroke, and reducing thrust wasted against the cylinder wall.)
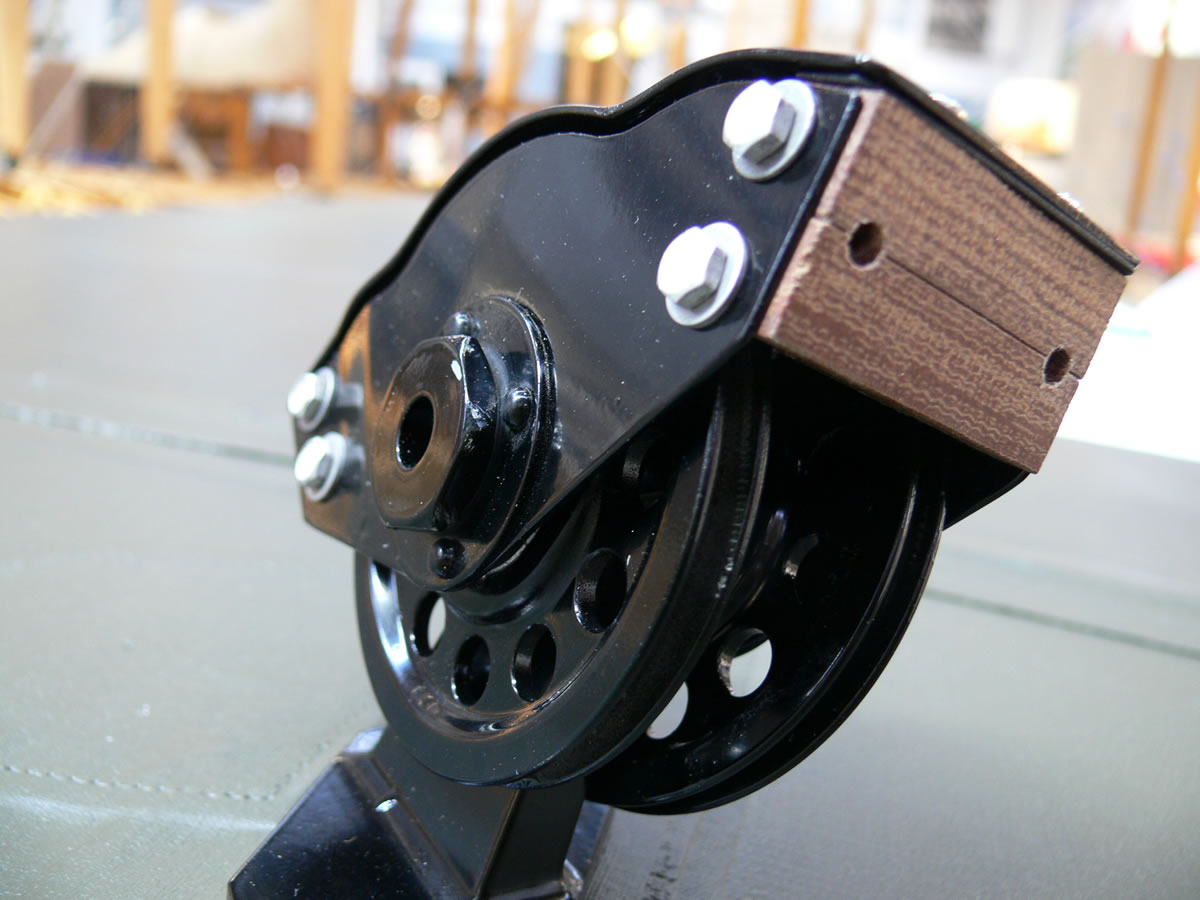
There are miles of control cable to look over, hundreds of split pins and castle nuts to check and almost every bit of it exposed, albeit some parts nearly thirteen feet in the air! One little oddity is the way in which many of the cable pulleys are hidden or enclosed, these intricate works of art house an aluminum pulley , ball bearings and a phenolic cable guide, each pulley housing resembles donut sized “UFO”. Even the 26 hand carved streamlined wooden struts must be checked for structural integrity. The structure of the airplane varies from massive rugged steel fittings to delicate wooden components all braced by cable and streamlined wire. At the aft end near the tailskid the wooden vertical struts seem to be overly wide and perhaps this was done to increase directional stability. Bulbous and blunt at the front, it is open and flimsy at the rear.
CLIMB ON BOARD

Once you have decided that you want to take control of this beast and wrestle it into the air you have to somehow climb on top of and get into the cockpit. Duck under the front brace wire and the aileron control cable, put one foot on the big main tire and reach up to grab something solid, Place the other foot on the step hanging below the nacelle and move your right foot from the tire to the wing root. Nearly there, just place one foot on the tiny metal step next to the front cockpit and then the other over the cockpit side onto the seat and you’re in! The cavernous size of the cockpit and lack of wind protection makes you aware there is nothing snug about these two cockpits. The crew positions are stepped so that the pilot can see over the observer/gunner, the front observers cockpit is very open and empty giving the gunner ample room to work.
“Bare and exposed describes both the front cockpit and the gunners position.”

A No.4 Mark IV gun mount in front cockpit – swivelling pillar on a universal joint and spring clips , dispersed around front of nacelle to allow the front gun to be positioned in a number of places. The rear gun fitted to the “scotch express” was a nonstandard pillar mount fitted with a Mk II Lewis gun . Both guns are fitted with Mk II deflector bags to catch the spent rounds before they fly through and damage the pusher propeller. Looking more like furniture than the inside of a war machine the front cockpit is fitted with a curving cupboard that holds spare Lewis magazines. Two sliding wooden doors allow access to the rear of the instrument panel and the compass. No seat is provided for the observer, just a pair of eyebolts to fasten a safety harness.In comparison, most aircraft of the day were pretty tight. The diminutive Nieuport fits like a glove, even the SE5 wraps around you and keeps you out of the elements. Once seated in the pilot’s seat, a unique control column with a brass triangular grip and integrated thumb-operated throttle is revealed. Trying to operate the controls on the ground is a chore, the weight of the elevators makes the control column heavy and awkward and the control stick mounted throttle seems a bit out of place. I’m already wondering what to do with my left hand.
The first impression is that the seat is comfortable and the controls are all within easy reach. Then you try to work your feet onto the rudder bar and the straps meant to keep your boots in place, to find the aileron cables rub the back of your feet and ankles while the rudder cables trap your shoes between the rudder bar itself and the cables. There are levers for spark advance, radiator shutter, mixture control, switches for the magnetos and the booster magneto and of course the valves for the air system and fuel system. The hand air pump is located within reach of your left hand and is about to get a workout. In order to transfer fuel to the gravity “service” tank located under the upper wing, you must first select “hand pump” on the air system and then “Service to main tank” on the fuel system. This transfer can only be done on the ground and prior to flight, as no provision is made in this position to send fuel to the engine. It takes a long time to transfer 8 imperial gallons of fuel to the top of this aircraft - long enough for your left hand to warrant a rest for the duration of the flight! It’s alarming to sit in such a large aircraft and not be able to see most of it. There is no way to peer around the cockpit shell to see the engine, no way to tell if you are leaking fluids or worse yet, if you are on fire! Even the tiny wind driven air pump is mounted below the fuselage out of sight. No way to check its operation prior to take off or during flight, hence the procedure to take off on the gravity feed service tank.
READY FOR TAKEOFF
The engine is relatively easy to start, in fact sometimes it starts itself ! After your engineer climbs up onto the wing root and carefully balances there while priming each of the six brass primer cups from a squirt can of raw fuel, he needs to clamber back to ground level and pull the engine through a few blades before the prime evaporates away. A call for “all switches off” signals the engineer that it is relatively safe to rotate the four bladed prop. Then, a call of “ready” from the engineer signals the pilot to make his last checks of all the cockpit controls and to ensure everything is in the proper position; fuel selector “Main tank to carb,” air selector “Hand Pump”, air pressure at 2.5 PSI, check service tank is full by looking at the glass sight gauge built into the side of the tank, position the spark advance to “retard” and now to try a start... Pilot calls “Clear” and selects “2” on the mag switch which allows the engine to run on both magnetos, then select “On” on the booster magneto switch, all this time the engineer is trapped in a maze of bracing wires and struts trying to remain clear of the soon to be rotating knives called a prop. If we are lucky the engine will come to life with just a spin of the booster mag, otherwise the engineer has to earn his keep and actually hand swing this very big, very awkward engine. Once started, maintain air pressure with the hand pump and keep the revs to below 800 RPM until the water temp reaches 60 Celsius. Move the spark advance lever to “Advance” and check for an increased smoothness in the engines’ beat. Before setting off it is a good idea to have your engineer look over the engine while it is running, as this aircraft is a pusher, there is no way of detecting oil, water or fuel leaks.

A run up to check the engine operation is performed with chocks in place and the engine brought up to its maximum static RPM of 1100, check each magneto and of course the idle speed. If the idle is greater than 600 RPM the airplane will have an excessive ground roll and may even “float” using way more runway than needed or available in some cases. No brakes on this machine, so we want to double check that idle speed before we put 3,000 lbs of wood, steel, fabric and wire into motion. Taxiing is fairly easy with good visibility forward and a steerable tailskid, just bear in mind there is a great deal of momentum with this ship and it doesn’t change direction or stop quickly, in fact it doesn’t do anything quickly. Check the wind direction, line up into the wind and switch to “Service tank to carb” make sure the air pressure is built up in the main tank just in case and go.
“Here’s where everything seems to revert to slow motion.”
Even when the throttle is advanced the engine only increases in speed to 1120 RPM, the airplane starts to roll and simply levitates into the air. A combination of huge wing area (nearly 500 Sq Ft) and an airfoil with a slight undercamber and tall Oleo gear, doesn’t give the Fee much of an attitude change as it lifts off. Lift off takes place just as the airspeed indicator comes alive at 40 MPH and the speed increases easily to the best rate of climb speed of 55-60 MPH. The rate of climb isn’t very impressive at only 300 feet per minute. Once an altitude of 750 feet is obtained you can safely switch the air selector to “mechanical pump” and check to see the air pressure is being maintained by the wind driven pump at 2.5 PSI. Now it is safe to switch to “Main fuel tank to carb”. Climb-out to the desired altitude is slow but steady as you become aware of the lack of prop wash and the stability of this big kite. Turns in either direction are smooth and coordinated, movement in any regime is easily carried out and you never loose faith in the controllability of this monster. The elevators are not as heavy as they were on the ground and the ailerons have plenty of authority. The rudder leaves a little bit to be desired but is sufficient. In contrast to the Fee, the Sopwith Camel with about the same horsepower (160 HP Gnome rotary) climbs like a rocket, swaps ends in a blink of the eye and can easily exceed 100 MPH. The performance difference is due mainly to the camel being half the fee’s size and a third of the weight! In the comparison of these machines, one can easily see how fast technology advanced during wartime.

Throttle back to 1250 RPM, the best “normal” speed and level out, this should give 70 -75 MPH and a smooth ride. The wind noise isn’t as apparent as it is in most open cockpit airplanes owing mostly to the pusher configuration. The view is extraordinary and the feel is unusually comfortable; you soon forget about the cables trapping your feet, the awkward throttle and even that you have no idea what’s going on behind you, I guess “ignorance is bliss”. There isn’t much to report on the flying characteristics; it flies like it looks - big, heavy slow and stable. I did find it odd that the entire throttle range seems to be about 250 RPM; I use 1300 for take off and the first part of the climb, reduce to 1250 to keep the temperature down and for cruise, then reduce to 1050 to descend. The stick mounted throttle doesn’t get used too much and it is very handy right where it is when you are trying to maneuver this heavy machine, it definitely takes two hands on the stick to throw this fighter about. Diving is an experience, point the nose down and you would expect all this weight to carry you to the ground at an alarming rate, not so, there is so much drag that there is hardly any acceleration until you input an excessive amount of forward stick. Even then the Fee doesn’t go much faster, it’s a chore to reach our never exceed speed of 110 MPH and even then the machine is steady and very predictable.

The view from this vantage point is stunning, however in combat conditions it is easy to see why the Fee was utilized best in defensive formations, it is very vulnerable from the rear. In fact even to the side the pilots view is obscured by the high cockpit sides extending above your shoulders and head. A few steep turns in either direction show no unusual characteristics, in fact the machine feels very strong and purposeful, it doesn’t get knocked about by the wind or have a serious gust response like the very light Sopwith Triplane. If you care to muscle the Fee around the sky it will oblige but it has its limits, speed bleeds away fairly rapidly, water temperature builds during the climb and it is very tiring.
“On a calm evening it would be like flying your lazy boy recliner around the valley, well except for that awful engine noise as the big Beardmore thumps along only a few feet behind your head.”
This “sparrow strainer” is a marvelous machine, it wouldn’t be my choice for a fighter, but it certainly is a joy to fly. Many reports from servicemen regarded this machine as rugged, reliable and purposeful, it certainly filled many roles. It takes a while to get used to the lack of airplane in front of you, but you quickly begin to rely on the relatively calm breeze blowing in your face. Surprisingly that seventy mile an hour wind is more comfort than nuisance, it’s much more bearable than the usual prop wash from a typical tractor configuration. This constant breeze becomes a great indicator of your attitude, just one more surprise the Fee has to offer. To further explore the performance envelope, a few stalls are in order. It doesn’t seem to matter how the fee is configured, it stops flying with a very gentle drop of the nose and if you really push it, a wing will drop. Recovery only takes a slight increase in speed by advancing the throttle or lowering the nose further, fly away again and claw your way back up to where you started. The only bad characteristic seems to be the lethargic rate of climb and that terrible buffeting when you retard the throttle. While exploring stalls and descents I came upon something I wasn’t exactly expecting, the drag created by the big four bladed prop at low speed. The drag created by the prop disc creates turbulence that passes over the tail section which can be felt throughout the aircraft.

The easiest way to avoid this condition is to simply keep the power up to a “zero thrust” RPM which seems to be about 1000 RPM for this engine and prop combination, anything below this RPM and you will feel it in the control stick, rudder bar and of course, the seat of your pants. The best part of this ship is the ability to have someone up front for the flight. Designed to accommodate a gunner or observer in the spacious front cockpit and allow him to move about unhindered, the space is open and free from any obstruction including a seat. Sitting up front today is a pleasure however; ninety years ago this would be much different, we could imagine the gunner up front and how little protection he had, no place to sit, low cockpit sides that didn’t have much support and of course the danger of being crushed by that big engine in the event of a crash. For takeoff and during most of the flight I would expect the gunner to sit and face rearwards and keep a lookout for enemy aircraft or the condition of his own machine since the pilot cannot see anything to the rear. Once ready to engage the enemy the typical position would be crouching to operate the forward facing Lewis gun or standing to fire the rearward facing gun which could be used to fire backwards over the wing. The gunner must have made spectacular gyrations to make his machine guns effective.
“It’s all about the proper gear; the Vintage Aviator even reproduced original leather coats worn by the RFC.”

At first I had no idea why there would be straps inside of a jacket and my inexperienced gunner obviously had no idea what he was in for on that first flight! As we climbed for altitude my observer attempted to stand and reach for the rear facing gun - in an instant he inflated like a balloon, funny at first but then the thought of him being pulled over the low sides of the front cockpit became very real. The cockpit only comes to just below your knee; you are more standing on the plane than in it. These RFC leather coats have straps inside that wrap around your legs to keep your coat from blowing open in the wind. Even the gunner’s gloves are a cross between gloves and mittens; they have a small fur lined mitten part that folds over the fingers to add even more warmth when you don’t need your fingers free for firing a gun. Flying any open cockpit airplane in the dead of winter wouldn’t be much fun, I think people often forget the war was fought even in the winter and sometimes at altitudes of ten thousand feet or more, the bone chilling temperatures must have been excruciating.
Pilot and gunner certainly had to work as a team; the pilot relied on the gunner to keep a lookout behind and the gunner relied on the pilot to help position the airplane to allow a shot to be taken. I was also amazed at how much influence on the airplane the gunner has, in level flight he can almost steer the airplane with his body position. You also notice how teamwork would be paramount for Fee crews, if the pilot wasn’t cognizant of the gunner’s position and what he was trying to do, the pilot could easily throw the gunner around the front cockpit recklessly while maneuvering haphazardly.
Time to land

Simply head back to the field and point the nose down a few degrees, throttle back to 1050 RPM and wait, the speed only builds to 80-85 MPH and the noise increases a bit. Check the T’s and P’s, well... the only temperature is water temp, and the only pressure to check is air pressure, if the water is cooling down you will have to close the cooling shutter by moving the appropriate lever aft. Consult the checklist once more and switch to “Service tank to carb” and prepare for a normal overhead rejoin.
Once in the pattern to land some planning is required, it’s a big machine and has a lot of momentum and very little climb performance, all factors when considering a “go around”. Turn downwind speed should be about 60 until you turn base at 55 then reduce to 50 over the fence and touchdown at 45. The undercarriage will make any landing short of a crash feel good. As you taxi back to dispersal, think about flying this machine with a full bomb load and at night, in all kinds of weather, or simply enjoy the smell of burnt castor oil and another piece of history brought to life by The Vintage Aviator Ltd.

